
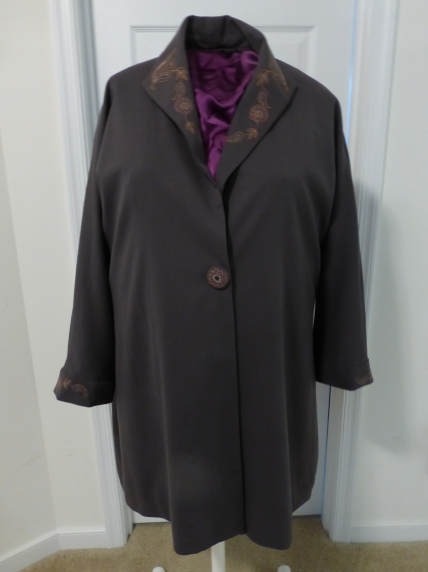
At least that is what I have been calling it. And as I go through the saga you may see why I chose that name. Continuing with my Sandra Betzina patterns (Today’s Fit Vogue), I made an out of print coat pattern – V1060.

I chose this pattern for a number of reasons. My goal was to have a lightweight, longer ‘coat’ to wear over the longer jackets and vests I am wearing; that was a little dressier than the coats I have. This pattern has a dolman sleeve. I am working on having a variety of styles I can go to when I want to make something without starting over with fitting every time. I was trying to figure out if I could work out a dolman sleeve to use going forward and I know Sandra drafts her dolman with a higher cut under the arm than most patterns. And I have become familiar with how to adjust her patterns for me without a lot of changes. (As a side note – it seems her older patterns are a little more close fitting than the newer ones.)
Fabric: A lightweight, slight stretch wool blend and was intended to be my muslin fabric. This has been in my resource center for a v.e.r.y long time. The color is a sort-of dusty purple-ish tone. Very drab. In response I used a bright purple lining.
Lining: A silk charmeuse I picked up at a sewing retreat. This is meant to be an unlined coat (meaning no lining pattern pieces, nor instructions related to lining). Why did I decide to line this? Because when I sewed the main pieces together and tried it on, the wool stuck to my clothing (I call it the “velcro-effect”) and I knew that would never work for regular wearing.
I drafted a lining using one of the videos in Sandra’s Power Sewing list. She and Ron Collins provide step by step information on drafting the lining. Unfortunately their instructions are for a standard tailored jacket; including notched collar, a back facing and set-in sleeve. First step in making this complicated – need to draft a back facing & take the shawl collar and dolman sleeve into account. There were some challenges that cropped up later because of this and I had to adapt.
How else can I make this more difficult? Let’s add embroidery! I have been looking for ways to incorporate embroidery into my garments and the collar of this coat seemed like a perfect place! Anyone who does embroidery knows how time consuming it is to choose the right design, position it, adjust it in software, stitch out samples, put it on the finished project and pray it all works out the way you envision it. Luckily this part went very well and I am happy with the embroidery designs and placement.
To choose embroidery threads I laid a bunch of threads on the fabrics until I found some that I thought were pleasing.
Right side of the shawl collar below. The scrunched fabric is an extra piece of the lining stuffed into the neck for the photo.

The embroidery designs came from a book called Contemporary Machine-Embroidered Fashions. I have had this book for many years and never used any of the designs until now.

My decision process consisted of looking at literally every embroidery design I have – there are many and they are in a variety of places (on the computer, separate disks, a few books that came with disks, etc). I ruled out the specific types – flowers, animals, insects, holiday motifs etc. I was looking for the more abstract designs. The designs I chose proved to work out well. I did some combining in my software so I could stitch the facings in 1 hooping.
Other changes to the pattern design: There are 3 waist darts for the front – I didn’t use any of them. I need to add more circumference if I am going to use those (see previous comment about ease in the older patterns); I did use 1 of the 3 back waist darts. I used a snap closure, with a decorative, covered button instead of the ties; and made bands for the sleeves instead of facings.
For the button, I was able to use one of the motifs.

The final coat:
On me: (My outfit for lunch with DH at the swanky, beautifully decorated Jefferson Hotel). I’ll blog the top next.

Close-up of the sleeve bands:

Will I make this pattern again? Not sure. It needs a number of changes. The sleeves are very wide at the hem and are supposed to be shaped. I removed several inches and they are still too wide. I need to make a shoulder adjustment – Sandra’s fleshy shoulder adjustment. Basically I need move the shoulder seams forward. They don’t hit me in the right place. And the bottom needs to be tapered a bit. It is very A-line.
And I think I am over lining things….I invested much more time in this than I ever expected. But once I got going I felt like I needed to finish it; one issue led to another. But I vowed it would not become a UFO. It is wearable. I love the neckline and collar. That is my favorite type of collar and flattering on me.
I’ll leave you with a few pictures from The Jefferson.
Hotel Lobby decorations:

The TREE:

Standing under the tree:

The gingerbread airplane:
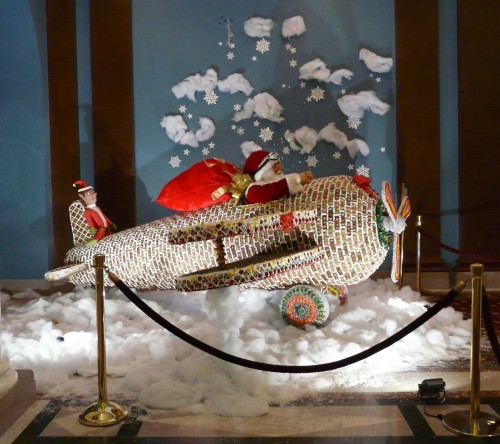
Close-up of Santa in the gingerbread airplane:

And finally, the ingredient list for the gingerbread airplane:

Happy Holidays to All!
